
I made these little trees for the
Kiwi Christmas Ornament Swap. They were such fun that I thought I'd share the process in a tutorial.
Read on and soon you too will have a little embroidered forest...
(Click
here to get the full sized pattern)
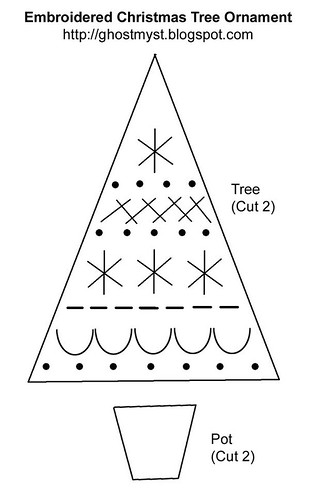
Supplies:Cream feltBlue feltFabric of your choice for back side (I used craft cotton and sealed the edges with a dab of glue to stop them fraying. You could use felt for this side as well, and even embroider it if you feel keen!)Embroidery thread in pale blue, mid blue and dark blueEmbroidery needle and beading needleSilver seed beadsCream organza ribbonStuffingWash-away fabric pen Cut out one tree shape from cream felt, and one from the backing fabric. Cut two of the pot shape from blue felt.
 Transfer the design to the cream felt with a wash-away transfer pen.
 Using 3 strands of thread: embroider the bottom row of french knots in mid blue.
 Embroider the middle row of french knots in mid blue.
 Embroider the top row of french knots in pale blue.
 Still using 3 strands: Make a line of running stitch in pale blue thread.
 Make a line of herringbone stitch in dark blue thread.
 Make a line of scallop stitch in dark blue thread.
 Now using one strand of thread: Make the top lazy daisy in mid blue.
 Switch to a beading needle if neccessary and stitch on a silver seed bead.
 Do the same for the row of 3 lazy daisies. All the embroidery is now complete! Rinse in some water to wash away the pen lines, and let dry.
 Take your two blue pot pieces and sandwich a piece of batting in between them (use a small piece of stuffing if you don't have batting).
 Blanket stitch the two pieces together. It doesn't matter if the batting pokes out at the top a bit.
 Now, take your embroidered felt and backing fabric, and place them wrong sides together. Pin them if you like. Holding the tree upside down, begin blanket stitching about 1cm in from the top left corner.
When you are about 1.5cm from the top, take a piece of ribbon about 17cm long. Fold it in half and pinch the 2 ends between the felt and backing fabric. Hold it in place as you stitch around the top of the tree.
 When you get back to the bottom of the tree, stitch about 1cm past the corner. Then fill with stuffing. Use a paintbrush or something similar to push little wads of stuffing into the corners.
 Insert the pot into the gap and continue stitching to close the gap.
 To finish off, tie a bow at the top with matching ribbon. Secure at the back with a dab of glue if neccessary.

 I made these little trees for the Kiwi Christmas Ornament Swap. They were such fun that I thought I'd share the process in a tutorial.


 When you are about 1.5cm from the top, take a piece of ribbon about 17cm long. Fold it in half and pinch the 2 ends between the felt and backing fabric. Hold it in place as you stitch around the top of the tree.
 When you get back to the bottom of the tree, stitch about 1cm past the corner. Then fill with stuffing. Use a paintbrush or something similar to push little wads of stuffing into the corners.
 Insert the pot into the gap and continue stitching to close the gap.
 To finish off, tie a bow at the top with matching ribbon. Secure at the back with a dab of glue if neccessary.
These are beautiful! Thank you so much for the inspiration and the tutorial.
ReplyDeleteWow, such elegant ornaments! Thank you for the great tutorial.
ReplyDeletethese are gorgeous! :)
ReplyDeleteSimply beautiful, I love mine and it's hanging on the tree.
ReplyDeleteThese are so lovely and what a great tutorial! Thanks for taking part in the Holiday Comment Expedition on Feeling Stitchy! I hope you have a great Holiday!
ReplyDeleteVery cute tree! I have decided to add handmade ornaments to my gifts next year and this is one that I will add to the list!
ReplyDeleteSuch a beautiful ornament ...
ReplyDeleteEvery once in awhile, I really feel the need to stitch ... I'll definitely want to try this.
Thank you!
How nice! I loved the colours used!
ReplyDeleteDear Ruth,
ReplyDeleteThank you very much!!!
Your tutorial is very special!!!
Kind Regards,
Carine
Thanks everyone for your comments - I hope you are enjoying stitching little trees!
ReplyDeleteThank you for this tutorial! I look forward to giving it a try. I found you thanks to the Buttermilk Basin blog and took the liberty of sharing a direct link to this post of a French quilters forum. I hope that's OK.
ReplyDeleteHi Beatrice, thanks for your comment. That's fine for you to share the link - I hope you and anyone else will find it helpful!
DeleteFound this through pintrest and looking forward to basing my Christmas ornaments for this year on this (going to play with colours and stitch combos, and may have to do continental knots in place of beads as some are going to families with young children). Im only just starting to get into embroidery so looking forward to a challenge
ReplyDelete